OBS Employee Maintenance Page
Enrolling an Employee with a Qualifying Life Event
Adding a Dependent
Terminating an Employee
Removing a Dependent
Search Employee
- Navigate to the Employee Maintenance page.
- Select “Search Employee Data”
- Scroll through the Results list for the employee or filter your search:
- Enter search criteria in the Employee ID, First Name, Last Name, Bill Group #, DOB, or Status fields.
- Filter the Results section by selecting the column descriptions. To undo the filter, select the column again until the arrow icon disappears.
- To view more records, navigate to the next page or edit the number of items displayed per page.
- To clear search criteria, select “Reset”
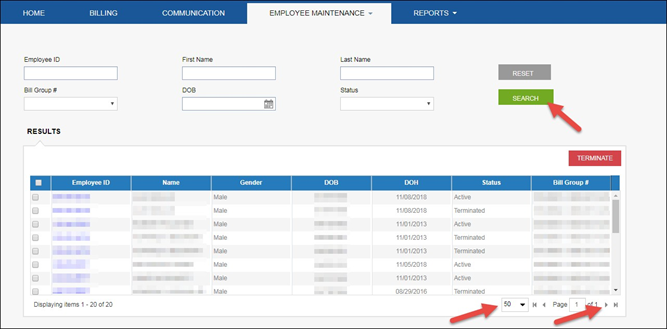
View Employee Details
- To view an employee’s demographic and coverage details, select the “Employee ID” hyperlink.
- There are 3 tabs to view: Demographic, Dependents, and Coverage.
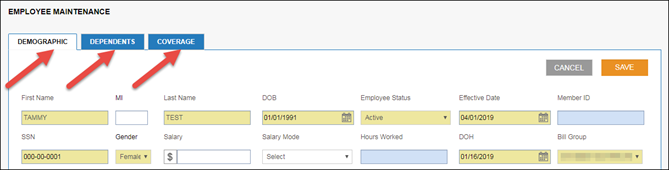
Enroll Employee
Select the Employee Maintenance tab and choose the “Add New Employee” option. Each of the 3 tabs must be entered in order to complete the enrollment: the Demographic tab, the Dependents tab (if there are dependents to enroll), and the Coverage tab must be filled out and saved.
If the Coverage tab is not completed, the employee will not be enrolled. A pop-up will remind the user that the Coverage tab must be completed after saving the Demographic tab.
Demographic Tab
- Fill all required (yellow) fields:
- Sensitive details: First/Last Name, DOB (Date of Birth), SSN (Social Security Number), and Gender.
- Enrollment details: Employee Status, Effective Date, DOH (Date of Hire), and Bill Group.
- Contact Role: This will always be “Self”
- Home Address: County is not required.
- Contact: if a Preferred Contact type is selected, the corresponding field below must be filled.
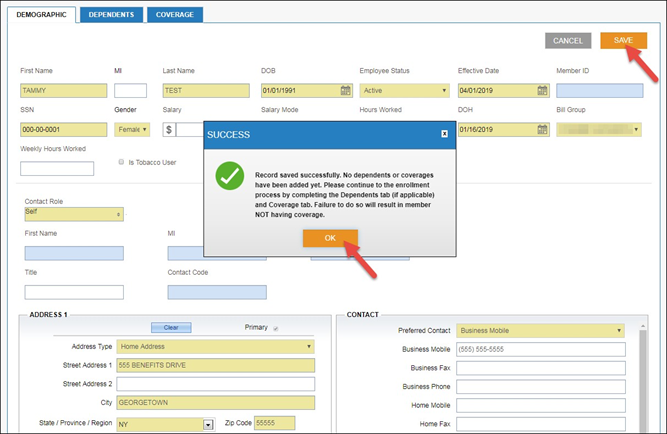
- Select “Save” – If required fields are missed or errors are found, a pop-up alert will display.
- A pop-up will remind the user to complete the remaining tabs in order to finish the enrollment.
- If the employee is enrolling with dependents, navigate to the Dependents tab, otherwise, skip to the Coverage tab.
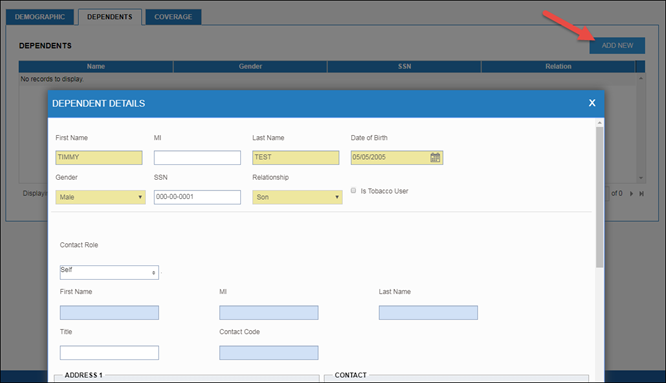
Dependents Tab
If the employee is not enrolling dependents to coverage, skip to the Coverage tab to complete the enrollment.
- Select “Add New” to input a dependent’s demographic
- Fill all required (yellow) fields:
- First and Last Name
- Date of Birth
- Gender
- SSN (required for adult dependents and requested for minor dependents, if available)
- Relationship
- Address and contact information is not required unless the dependent lives at a separate address.
- Select “Save” after scrolling to the bottom of the Dependent Details window.
- To add additional eligible dependents, repeat the steps above.
- Once all dependents have been added, navigate to the Coverage tab.
Adding a dependent’s demographic information does not automatically add them to coverage. To add dependents to coverage, proceed to the Coverage tab.
Child dependents become ineligible on their 26th birthday – any child dependents enrolled at that time will automatically terminate from coverage at the end of the month following their 26th birthday.
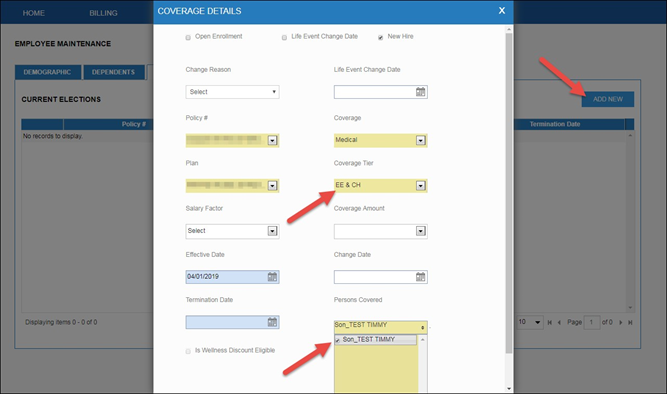
Coverage Tab
- Select “Add New” to add a line of coverage.
- Mark the appropriate box at the top of the Coverage Details window to indicate the reason for the enrollment. Please note Open Enrollment changes are not to be processed online.
- Proceed to filling all required (yellow) fields:
- Select the Policy Number
- Select the Coverage type – Medical or Dental
- Select the Plan – if no plan options appear, reach out to globalbilling@tbsmga.com (for groups Headquartered Internationally) or billing@tbsmga.com (for groups headquartered domestically) to have the plan added to the group’s account structure.
- Select the Coverage Tier
- Select Persons Covered – Mark each box by every dependent enrolling.
- Scroll to the bottom of the window and select “Save”
- The Coverage Details window will close and a line of coverage will display under “Current Elections”
- If there is additional coverage to enroll, repeat the steps above.
Qualifying Event
Employee Enrollment per Life Event
- Follow “Enroll Employee” steps (above) all the way through step 3 (above). Be sure to select “Life Event Change Date” at the top of the Coverage Details window.
- In addition to the required fields, indicate the Change Reason and Life Event Change Date.
- Scroll to the bottom of the window and select “Save”
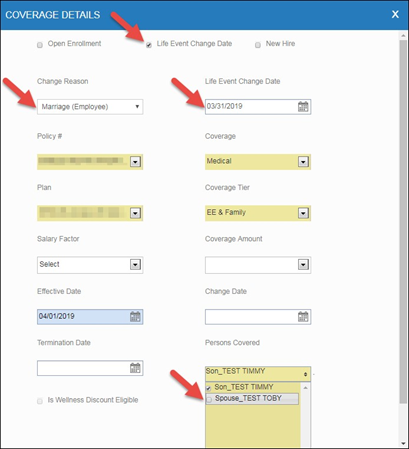
Add Dependents to Existing Coverage
- Navigate to the Employee Maintenance tab and select “Search Employee Data”
- Search for the employee experiencing the Life Event.
- Select the hyperlink under the Employee ID column to view the member’s details.
- Navigate to the Dependents tab and select “Add New”
- Fill all required fields in the Dependent Details window and select “Save”
- Navigate to the Coverage tab.
- Select the hyperlink under the Coverage column to open an active line of coverage. (Active coverages will not have a termination date)
- Mark the “Life Event Change Date” box at the top of the Coverage Details window.
- Select the Change Reason and enter the Life Event Change Date.
- Update the Coverage Tier and Plan, if necessary.
- Enter the Change Date as the date before the change should be effective. For example, to enroll a spouse due to marriage with a 4/1/2019 effective date, the change date would be 3/31/2019.
- Under the Persons Covered field, mark the box next to each enrolling dependent.
- Scroll to the bottom of the window and select “Save”
- The window will close. If the Coverage Tier or Plan was changed, a new line of coverage will display under “Current Elections”
- If applicable, open any additional active coverage line and repeat steps 8-13.
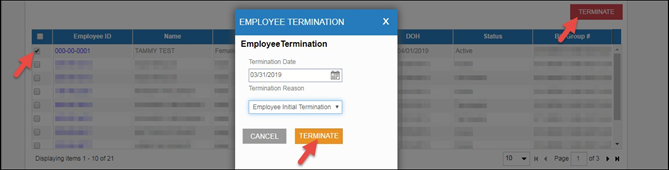
Terminate Employee
- Navigate to the Employee Maintenance tab and select “Search Employee Data”
- Search for the employee and mark the box next to the corresponding employee record.
- Select “Terminate” and the Employee Termination window will appear.
- Enter the Termination Date – the last day of the month following the employee’s last day worked.
- Under Termination Reason, select “Employee Initial Termination”
- Select “Terminate” to confirm. (Selecting “Cancel” will close the pop-up without saving)
Remove Dependent
- Navigate to the Employee Maintenance tab and select “Search Employee Data”
- Search for the employee and select the hyperlink under the Employee ID column.
- Navigate to the Coverage tab and open an active line (no termination date) of coverage.
- Mark the “Life Event Change Date” box at the top of the Coverage Details window.
- Select the Change Reason and enter the Life Event Change Date.

- Enter the Change Date as the date before the change should be effective. For example, to remove a spouse due to divorce with an effective date of 4/1/2019, the change date would be 3/31/2019.
- Under the Persons Covered field, un-mark the box next to each dependent being removed.
- Scroll to the bottom of the window and select “Save” to close the window.
- If the Coverage Tier or Plan has changed, a new line of coverage will display under “Current Elections”
- If the dependent(s) are being removed from another line of coverage, open the additional line of coverage and repeat steps 3-8.
Related Articles
OBS Billing Page
Search Invoice Navigate to the Billing Tab Enter the desired search criteria in the correlating fields: Select Status “Paid” to search past invoices. Select Status “Due” to search current invoices. Add date range from the 1st of the desired month(s) ...OBS Home Page
Payments Due All outstanding balances are listed in this section. The hyperlink in the Amount column opens the invoice details. From there, various actions can be performed such as review billing details, pay or print a bill, print a coupon, or ...OBS Reports Page
Employee Participation Report This report will generate a current census. The filters are customizable. The 3 required fields are highlighted in yellow. From the Reports tab, click on Employee Participation Summary Enter the required field, Carrier. ...OBS Communication Page
The Communication page allows you to view correspondence that TBS has previously sent out to the group regarding the account.OBS Eligibility Locked
There are some instances where a group administrator will not be able to make eligibility changes in OBS. They could be either of the following: New Business Installation - group administrators are not given access to OBS until the group is fully ...